

|
Complete
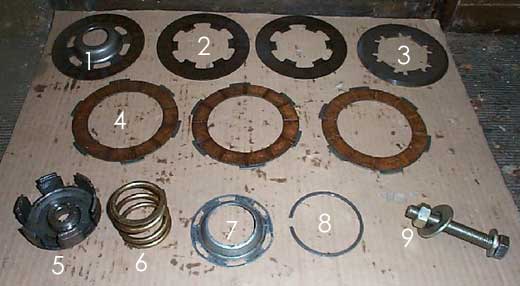
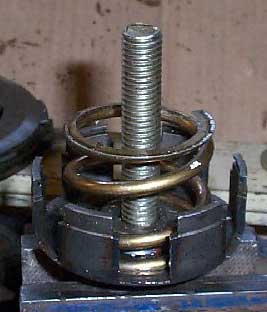
Vespa smallframe engine stripdown and rebuild. The clutch on a smallframe vespa is an elegantly simple design consisiting of steel plates, some with cork and some without, sandwiched together by a bloody great spring. Later PKXL2 models have a PX style of clutch with several smaller springs, but the concept is the similar. There will either be 3 cork plates on a standard clutch, or 4 on an aftermarket racing clutch. As long as it puts power down without slipping and disengages smoothly enough to change gear then whichever type you choose is up to you. Just remember to order a complete rebuild kit with steel plates and cork ones. In a 3 plate clutch the plates are thicker than in a 4 plate, both steel and cork, and you can't mix the two. To dismantle and rebuild the clutch you need a clutch compressing tool. You cannot do it without it, but you can make your own for a fraction of the cost of the factory item. All it is is a hefty and long bolt and two chunky washers and a nut. One washer must be small enough to slip inside the clutch bell, but big enough that it does not go through the hole in the middle of the clutch. The other washer can be as big as you like. If fact I use a steel mirror mounting bar instead (like you bolt under the handlebars) because you can grip it and a spanner at the same time to make the job easier. Remember this stuff has to compress the clutch spring, so overengineered is best. You can see one in the second picture below. All these pictures come from Robin Sanderson who is undertaking the rebuild of a Piaggio Ape, powered by a version of the Vespa 50 engine. Once you have removed the clutch from the bike you will have in your hand (assuming it was in one piece) something like this:
To dismantle this you need your clutch compressor tool. Put the bolt through the middle of this assembly such that a large washer sits on the underside preventing the bolt head from coming through the centre, and the slightly smaller washer slips inside the aluminium retainer ring, but not inside the centre of the clutch baseplate. Now carefully tighten the nut on the bolt until it can tighten no more, compressing the spring and enabling the removal of all the parts of the clutch. When dismantling, first remove the circlip, then the thin aluminium retainer ring will come away, along with the top plate and all the clutch plates. Now gradually undo the nut, releasing tension on the spring. When the assembly is loose remove the nut and you can separate the clutch baseplate, spring and inner clutch bell. When you have dismantled everything you should have this in front of you:
1. Baseplate. This sits on top of the spring. Now to reassemble the clutch. The following pictures were taken with spare parts, but you should be using brand new clutch plates and steels which have been soaking in gearbox oil for 24 hours (unless you really want to burn out your new clutch plates). You don't need a vice for this (in fact I've had to do this at the roadside) but it makes things easier. First put the inner basket on the bolt shaft and place the spring in it. New springs are dirt cheap so you may as well use a new one. They are avaliable in different degrees of stiffness for tuned engines:
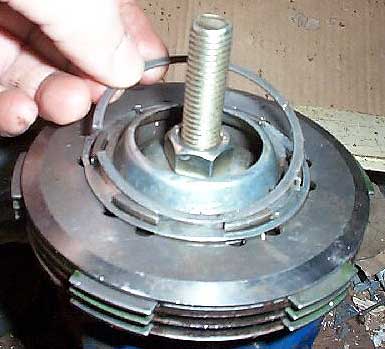
Now put the baseplate on top of the spring, lining up the holes with the tangs on the inner basket. Tighten the washer and nut onto the bolt, carefully compressing the clutch spring:
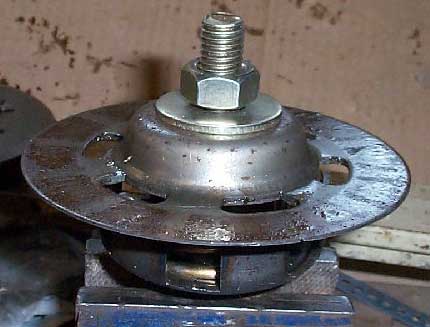
Once tightened it should look like this:
Once you have finished place the top plate on. This has lugs which engage on the inner basket, but also small pegs that make sure the inner basket does not spread under heavy load:
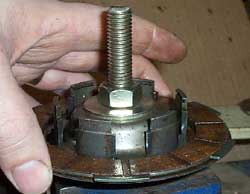
Now the aluminium retaining ring can go on. If the spring needs compressing a bit more tighten the nut on the bolt. Now clip the circlip into the groove on the inner basket tangs:
Make sure the circlip is seated securely, preferably with the opening completely enclosed by one of the tangs. When it is in place carefully release the tension on the spring and remove the spring compressor, making sure the circlip remains in position. When replacing the clutch in the engine it is easier to put a dab of silicone on the woodruff key to hold it in place before placing it in the keyway. Now align the lugs on the cork plates with the gaps in the outer basket, and rotate the rear axle to align the keyways. Finally jam the primary drive with a penny and replace the tab washer and clutch nut, tightening the latter to drive the clutch down onto the gearshaft. Remove the penny, replace the clutch activator pad and the clutch cover (with new gasket and sealer) and connect and adjust the clutch cable. |


Back to Tech Index
Previous - Installing a Polini 130 cylinder kit