

|
Complete
Vespa smallframe engine strip down and rebuild. Now we are getting to the exciting bit - power! This page should be read if you are not installing a Polini kit, as many of the principles are excactly the same whether you are installing the stock cylinder on your 50 special or installing a full house Malossi 133 kit (and some are very different. If you're installing a Zirri MR2000 kit I hope you are good mates with the guy who owns a great machine shop) The first thing you need to do is make sure your cylinder fits. Exactly. You don't want a gap of even 1mm if you can avoid it. If your cases are good then you shouldn't have a problem I found the quality of the Polini 130 cylinder excellent., and it was a perfect fit without any filing needed to my ET3 cases. File any rough burrs smooth, keeping the debris out of the cylinder or engine. If you are just fitting the cylinder straight on without any porting then you won't generate vastly more power than a stock ET3, but it lasts longer and you will get a nice fat tourque curve to match. This is exactly what I did. porting and big carbs would ne nice but I can only afford to do things to the smallframes.com project bike a little bit at a time, and a full tuning job is beyond my price range and budget. There would be no job at all if my old cylinder was still up to the job of hauling my fat arse across London. This approach also saves me the temptation of using all that new power and seizing the engine. What is it about the Polini 130cc kit that makes it more powerful than a 125 ET3 Cylinder anyway? It's only a teaspoon more in displacement terms after all. Let's take a look:
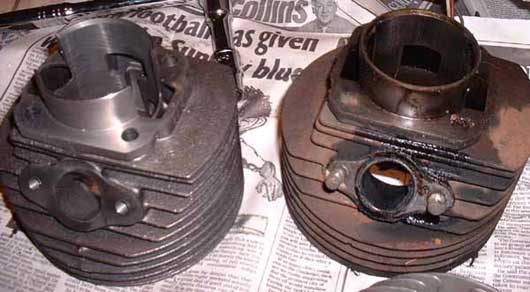
Ignoring the obviously not-well condition of the ET3 cylinder these cylinders look very similar. The main difference visible here is the difference in the case port windows. On the ET3 they cylinder liner section is complete around the base, with the port windows cut into the sides, whereas those on the Polini cylinder are larger and start at the base of the cylinder liner. You can see this better at the side. What is not readily apparent from a visual comparison, but becomes clear when you mate the Polini cylinder to the cases is that the size of the port windows is much larger on the cylinder than on a standard set of cases.
To get the full power from the kit the case should be opened up by grinding and filing material away until it matches the ports on the cylinder. This will make a vast difference to the power, but if you don't want to do this for whatever reason you will still get a useful power boost from the transfer ports further up the cylinder:
As you can see from the above shot the 3-transfer ET3 cylinder has nothing on the 7-transfer Polini cylinder! To be honest I don't know why any of this lot makes it better than the ET3, but clearly Polini do, so we don't need to worry! Even on an otherwise bog-standard ET3 engine (but with a Leovinci pipe) the Polini cylinder means noticeably more tourque and tractability right through the rev range and it doesn't run out of puff the way an ET3 will, giving you over 5hp between 6500 and 9500 rpm A comparison of the cylinder heads seems to show that they are very similar, but a visual inspection is not enough to say one way or the other. I think the Polini head has a larger combustion chamber.
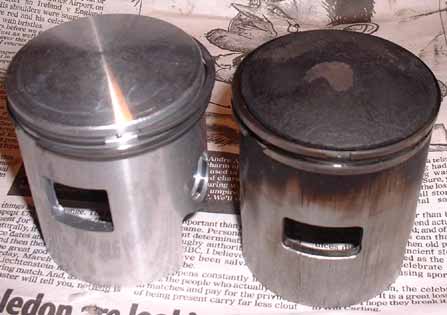
The pistons on the other hand do look different. The Polini one has a larger intake window and the side skirt is cut away more than the ET3 one.
So that's that. Now to go about putting all this in our engine. If you arrived here after all the other engine articles then you have a built up engine minus a cylinder, piston and head, (and clutch and flywheel, but that's not relevant until the next page). If you came straight here and your engine is still complete then remove your cylinder and piston first. The following instructions assume you are replacing a 125cc cylinder with a 130cc kit. If you have a smaller displacement engine you need to consider whether other procedures are necessary - for example changing the crank, fitting long cylinder studs to your engine, etc. These instructions also do not go into the mechanics of porting the cases to match the cylinders, or installing a cut crank. (The Polini instructions give you advice on how to cut your own crank. Don't do it! buy a Mazzuchelli once instead!) Before starting, wash your cylinder and piston with petrol, and then give the inside of the cylinder a smearing of 2-stroke oil. First you need to install the piston. Put the caged roller bearings in the conrod small end, and hold the piston over it with the intake hole facing the intake (and the arrow on the top facing the exahust), lining up the holes, then pass the wristpin through the piston, conrod and other side of the piston. Secure it in place with the wire clips provided (circlips on a stock piston). On the piston there are two grooves for piston rings, Look closely at them and you'll notice there are two "stops" in the grooves. These are where you locate the ends of the piston rings. Fit the piston rings loosely now and roughly in the right place. The idea is the ring gaps will not pass over any of the ports, and the cylinder will keep them compressed. Smear a thin coat of gasket sealer or silicone batroom sealer on both sides of a new cylinder base gasket. Slide the new cylinder (minus head!) down the cylinder studs, taking care not to drop it, damage the piston or do anything bad at all. Put the piston into the opening of the cylinder, whilst at the same time pinching the top ring to compress it with the ring gap exactly on the "stop". When this is done repeat the process for the second piston ring. Once they are both in the cylinder it should be possible to slide the piston into the cylinder and the cylinder down onto the cases. If it's still possible to turn the engine then you have done it right and can put the cylinder head on. Smear a thin coating of gasket sealer onto the mating surface of the cylinder head and slide it down the studs into place, with the spark plug hole facing the flywheel side of the engine. Now replace the washers and nuts on these studs and torque them down equally, going round the head. |


Back to Tech Index
Previous - Reassembling the engine