

|
Complete Vespa
smallframe engine strip down and rebuild. 1. Removing the engine from the frame The first thing you need to do before you start any work at all is make sure you have the right tools. You can do almost everything with a standard set of sockets and spanners, but you need to have the following:
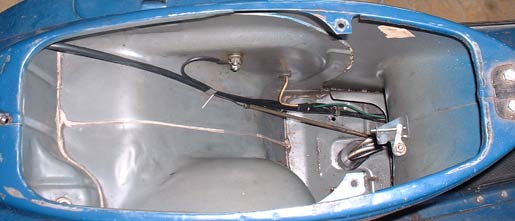
The first thing you need to do is drain all the oil from the engine by undoing the oil drain bolt underneath the engine and letting it pour into a suitable container. I find a plastic sealable noodle tray from the local Chinese takaway is absolutely perfect for the job. If you can, make sure you dispose of it sensibly and dont just pour it down the drain. Right. Now let's get down to business. First lift the seat, and undo the bolts holding the petrol tank on. The seat post takes a 15mm spanner and the small bolts are 11mm. Now remove the storage bucket. Now make sure the petrol tap is closed, and pull the fuel hose off the carburettor. As long as the petrol tap is off there's no need to worry about losing more than the little bit of petrol in the hose. You'll need to slide the little clip up the hose first. Make sure you don't lose this piece. Now's the time to get your first sandwich bag. Put the hose clip, the seat post and all the tank bolts and washers in the bag and write on it with the permanent marker to remind you what the hell's in there when you come to rebuild the engine! Do this every time you remove something and putting this jigsaw back together again will be a piece of cake. To remove the tank block up the fuel hose - a bung or screw will do fine, because you need to turn the petrol tap to the On position to lift the tank out, then carefully lift out the tank, and drain off the petrol into your container - I used a well washed 2 litre cola bottle, but that's cos I'm too cheap to buy a petrol can. Now you need to remove the carburettor. Disconnect the choke cable from the lever by lifting off the hook (leave it on the carb) and disconnect the throttle cable from the carb by undoing the little brass cable clamp and then sliding the cable through the cable adjuster. This throttle clamp is tiny and very easy to lose so either screw it back on the cable or put it in another bag. The carburettor is held on by a ring with a large bolt on one side. There is a screwdriver slot at the top and the shaft is hex shaped. Use either a screwdriver or spanner to loosen the ring (you'll probably need a spanner to shift it at first, but there's not much room in there so switch to a screwdriver once it's loose. Now just shimmy it and the carburettor of the manifold. Carburettors are delicate things so be careful with it. There's a rubber air bellows just visible at the manifold, which needs to be pushed out of the hole so it will come off when you drop the engine. Once you've done all this the space under the seat should look like this - huge and capacious!
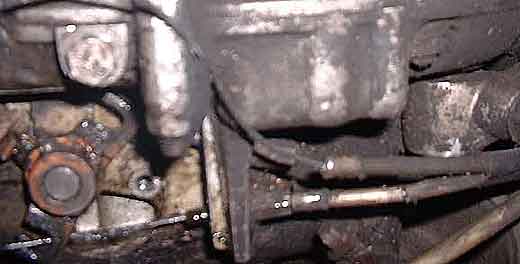
Next up is the exhaust. With standard box type exhausts they don't really get in the way in the first place so you can leave the exhaust in place for now. With an ET3/SS50/SS90 type exhaust, or most aftermarket tuning exhausts it is advisable to completely remove the silencer now as the expansion chamber on these is in the way of everything else. Luckily the designers of these pipes are not unaware of this and invariably the expansion chamber can be separated from the manifold pipe. Undo the 17mm bolt that holds the silencer onto the swingarm (see the exhaust page for pictures). Depending on the type of exhaust you have the silencer will either slide off the loosened bolt or you'll need to fully remove the bolt to get the silencer off. If it's the latter you may find it helpful to deflate the rear tyre. Either remove and keep the 17mm bolt safe or tighten it back into the swingarm. At this point you can remove the rear wheel which will make it easier to get at certain things such as the rear brake cable, and also allow the engine to drop at the rear. If you want to remove the wheel just remove it at the 5 rim bolts, keeping the hub in place. However before you do this you should lever off the hub centre cap and make sure you can undo the hub nut. You need to pull out the split pin before you can turn it. If the nut is stuck fast it's a damn sight easier to apply force while the rear wheel is still on. Have someone apply the rear brake (or put something heavy on the pedal). If it is stuck an impact wrench will shift it, or put a socket shaft and a 22mm socket on a hammer drill and run it in reverse with hammer action. If neither of these options are available to you put your 22mm socket on a normal wrench and while applying turning force wallop the centre with a hammer a few times. Actually the hitting-with-a-hammer method of loosening seized nuts and bolts is one you will profitably refer to on many occasions while rebuilding your engine. Once it is moving then keep it on there but leave it loose. Obviously if you are removing the rear wheel then you need to support the scooter somehow. I use my trusty "milk crate pinched from outside a shop" that was introduced in the exhaust article. If you have a blanket or something to protect your paintwork (or, like me, you simply don't care) then almost everything from now on is actually easier if the scooter is lying on its side. Before you can drop the engine you will need to disconnect all control cables and electrical connections between the frame and the engine of the scooter. We'll do cables first as it's more straightforward. Here are the locations of all the cables:
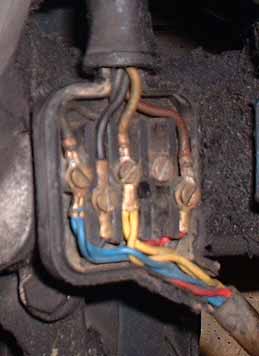
The cable clamps for the clutch and the gear change consist of a shell with an 8mm hex head and a bolt with a 7mm hex head. This is a stupid design which will cause you much frustration when you come to reconnect everything. If you can find an alternative that replaces the 7mm bolts with ones that can he turned with screwdriver or Allen key then you will have a much easier time of adjusting your gear cables at the side of the road in the rain. Who sells 7mm spanners anyway? To remove the gear cables you will need to remove the gear selector cover. Inside it looks like this, (but in better focus):
If your bike has the original cable outers you'll notice that the gear selector cables have differently coloured outers. If they are the same colour then you must mark one of them now. Note which cable goes to which side of the selector before you remove them or your gears could end up backwards when you reassemble the scooter.
If however you have an ET3 (or possibly some model with electronic ignition, like a 100 Sport or a PK but I've never seen one) the CDI box is located on the other side of the bike in the cowl glovebox. You need to disconnect all the LT (Low Tension) wires from this box (noting where they belong) by pulling them away. They have spade connectors (on my bike at least) The HT (High Tension) spark plug lead will not simply pull away. I have heard it can be unscrewed, but I didn't know this at the time so I cut the plastic protective tubing that binds the HT and LT wires and removed the HT lead from the spark plug, leaving it connected here. Once all the electrical connections are free you can remove the engine. At the front the engine is held by one long bolt that goes through the frame and swingarm. If you laid your bike down you might find it easier if the bike is temporaily put upright, perhaps using milk crate technology. Undo the nut and gently tap the bolt through with a hammer. When you are ready to take the weight of the engine pull it out the other side to free the engine at the front. At the rear you can either undo the shock absorber bolt at the top of the shock, under the seat, or remove the bolt at the bottom of the shock. One spanner versus two - it's your choice. If you're going to replace the shock or clean it up then you might as well undo it at the top. There you go, one engine separated from the scooter. |

Back to Tech Index